Saya sudah berencana menulisnya sejak lama, namun saya sering lupa. Mumpung ingat saya akan bahas bagaimana saya melakukan setup untuk Kubernetes Cluster mulai dari provisioning server, pemilihan port, hingga kubernetes. Ini adalah artikel yang panjang, saya harap kalian tidak bosan membacanya. Jadi langsung saja kita mulai.
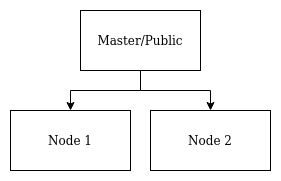
Struktur Cluster
Jadi disini saya ingin membuat total 3 server, 1 untuk server master dan 2 untuk server node.
Pertama, untuk Provisioning server, saya sering menggunakan Terraform. Alat ini sangat cocok dan memang didesain untuk melakukan tugas penyiapan cloud server. Siapkan sebuah file berformat .tf. Untuk installasi Terraform sendiri bisa kalian cek disini. Dan mulailah menulis konfigurasi.
Berikut adalah susunan direktori kerja kita untuk terraform.
1
2
|
├── credentials
└── server.tf
|
File Credentials (tidak perlu jika kalian sudah login menggunakan aws-cli). File ini berisi credentials yang diperlukan untuk login ke VPS kita. Normalnya kita menggunakan IAM (Identity and Access Management), namun karena kita menggunakan akun gratisan. Maka itu bisa didapatkan pada halaman Vocareum > Account Detail > Show AWS CLI, lalu copy semua ke dalam file credentials. Kelemahannya ini hanya berlaku sekitar 3 jam.
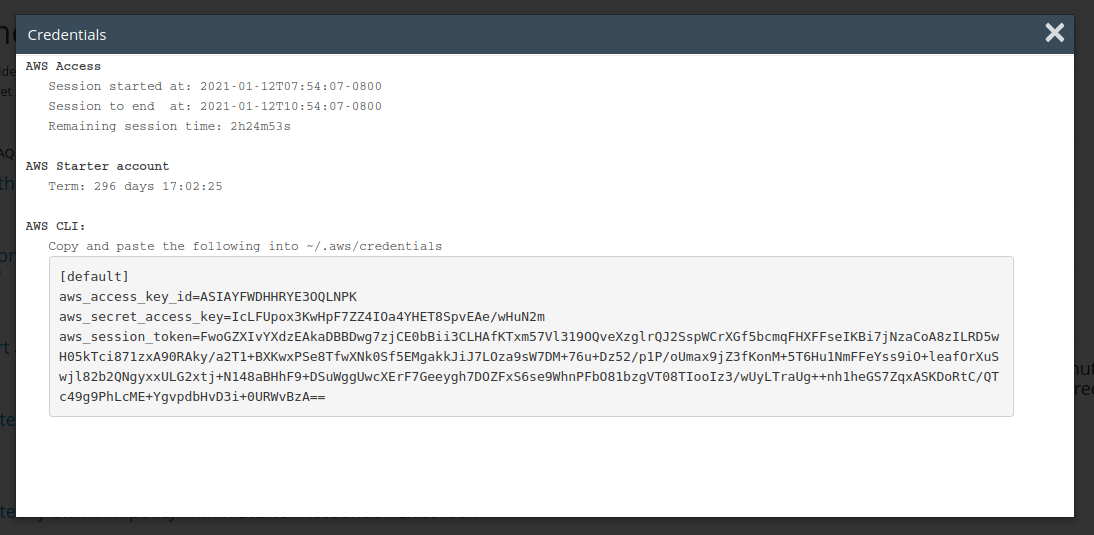
Dalam deskripsinya tertulis Copy and paste the following into ~/.aws/credentials. Namun jika memang tidak mau memasang aws-cli (seperti saya). Kita akan buat file credentials yang nantinya akan dipanggil didalam file konfigurasi terraform.
File Konfigurasi Server
Disini kita baru mulai tahap provisioning instancenya. Untuk subnet yang saya gunakan adalah subnet default yang by default sudah ada di VPC saya dan untuk SSH Key saya juga sudah memilikinya sebelumnya.
  1
  2
  3
  4
  5
  6
  7
  8
  9
 10
 11
 12
 13
 14
 15
 16
 17
 18
 19
 20
 21
 22
 23
 24
 25
 26
 27
 28
 29
 30
 31
 32
 33
 34
 35
 36
 37
 38
 39
 40
 41
 42
 43
 44
 45
 46
 47
 48
 49
 50
 51
 52
 53
 54
 55
 56
 57
 58
 59
 60
 61
 62
 63
 64
 65
 66
 67
 68
 69
 70
 71
 72
 73
 74
 75
 76
 77
 78
 79
 80
 81
 82
 83
 84
 85
 86
 87
 88
 89
 90
 91
 92
 93
 94
 95
 96
 97
 98
 99
100
101
102
103
104
105
106
107
108
109
110
111
112
113
114
115
116
117
118
119
120
121
122
123
124
125
126
127
128
129
130
131
132
133
134
135
136
137
138
139
140
141
142
143
144
145
146
147
148
149
150
151
152
153
154
155
156
157
158
159
160
161
162
163
164
165
166
167
168
169
170
171
172
173
174
175
176
177
178
179
180
181
182
183
184
185
186
187
188
189
190
191
|
## AWS Provider
terraform {
  required_providers {
    aws = {
      source  = "hashicorp/aws"
      version = "~> 3.0"
    }
  }
}

## Init Credentials Profile and Region
provider "aws" {
  profile = "default"
  region  = "us-east-1"
  shared_credentials_file = "credentials"
}

## Public Security Group
resource "aws_security_group" "public-sec" {
  name        = "public"
  description = "Public Server Security Group"

## SSH, HTTP, HTTPS Access
  ingress {
    from_port   = 22
    to_port     = 22
    protocol    = "tcp"
    cidr_blocks = ["0.0.0.0/0"]
  }
  ingress {
    from_port   = 80
    to_port     = 80
    protocol    = "tcp"
    cidr_blocks = ["0.0.0.0/0"]
  }
  ingress {
    from_port   = 443
    to_port     = 443
    protocol    = "tcp"
    cidr_blocks = ["0.0.0.0/0"]
  }
## Kubernetes Cluster
  ingress {
    from_port   = 6443
    to_port     = 6443
    protocol    = "tcp"
    cidr_blocks = ["0.0.0.0/0"]
  }
  ingress {
    from_port   = 2379
    to_port     = 2380
    protocol    = "tcp"
    cidr_blocks = ["0.0.0.0/0"]
  }
  ingress {
    from_port   = 10250
    to_port     = 10250
    protocol    = "tcp"
    cidr_blocks = ["0.0.0.0/0"]
  }
  ingress {
    from_port   = 10251
    to_port     = 10251
    protocol    = "tcp"
    cidr_blocks = ["0.0.0.0/0"]
  }
  ingress {
    from_port   = 10252
    to_port     = 10252
    protocol    = "tcp"
    cidr_blocks = ["0.0.0.0/0"]
  }
  egress {
    from_port   = 0
    to_port     = 0
    protocol    = "-1"
    cidr_blocks = ["0.0.0.0/0"]
  }
  tags = {
    Name        = "public"
    Description = "Public Server Security Group"
  }
}

## Elastic IP for Public Instance
resource "aws_eip" "lb" {
  instance = aws_instance.public.id
}

## Create Public Instance
resource "aws_instance" "public" {
  ami               = "ami-00ddb0e5626798373"
  instance_type     = "t2.medium"
  source_dest_check = false
  key_name          = "key"
  subnet_id         = "subnet-5ba4f616"
  private_ip        = "172.31.16.20"
  vpc_security_group_ids   = aws_security_group.public-sec.*.id
  tags = {
    Name = "public"
  }

## Disk Space
  root_block_device {
    delete_on_termination = true
    encrypted             = false
    iops                  = 100
    volume_size           = 10
  }
}

## Node Security Group
resource "aws_security_group" "node-sec" {
  name        = "node"
  description = "Node/Worker Security Group"

## SSH Access
  ingress {
    from_port       = 22
    to_port         = 22
    protocol        = "tcp"

## Close all traffic IP after setup!
    #cidr_blocks     = ["172.31.16.20/32"]
    cidr_blocks    = ["0.0.0.0/0"]
  }
## Kubernetes Cluster
  ingress {
    from_port   = 10250
    to_port     = 10250
    protocol    = "tcp"
    cidr_blocks = ["172.31.16.20/32"]
  }
  ingress {
    from_port   = 10255
    to_port     = 10255
    protocol    = "tcp"
    cidr_blocks = ["172.31.16.20/32"]
  }
  ingress {
    from_port   = 30000
    to_port     = 32767
    protocol    = "tcp"
    cidr_blocks = ["172.31.16.20/32"]
  }
  ingress {
    from_port   = 3000
    to_port     = 3000
    protocol    = "tcp"
    cidr_blocks = ["172.31.16.20/32"]
  }
  egress {
    from_port   = 0
    to_port     = 0
    protocol    = "-1"
    cidr_blocks = ["0.0.0.0/0"]
  }
  tags = {
    Name        = "node"
    Description = "Node/Worker Security Group"
  }
}

## Elastic IP for Node Server (Temporary)
resource "aws_eip" "lb-node" {
  count = 2
  instance = aws_instance.node[count.index].id
}

## Create Instance Node
resource "aws_instance" "node" {
  ami                         = "ami-00ddb0e5626798373"
  instance_type               = "t2.small"
  associate_public_ip_address = false
  source_dest_check           = false
  key_name                    = "key"
  subnet_id                   = "subnet-5ba4f616"
  vpc_security_group_ids      = aws_security_group.node-sec.*.id
  count                       = 2
  tags = {
    Name = "node-${count.index + 1}"
  }

## Disk Space
    root_block_device {
    delete_on_termination = true
    encrypted             = false
    iops                  = 100
    volume_size           = 10
  }
}
|
Setelah semuanya terkonfigurasi, informasi tentang kode sudah saya masukkan, untuk lebih lengkapnya bisa kalian baca sendiri pada Website Dokumentasi Terraform, jalankan perintah terraform init untuk inisialisasi version control Terraform dan Terraform juga mengunduh tools yang dibutuhkan untuk provisioning cloud server AWS. Setelah semuanya selesai jalankan perintah terraform apply.
Tulis yes untuk konfirmasi (jika konfigurasi sudah dirasa benar).
![[GIF] Terraform Apply](/p/setup-kubernetes-cluster-pada-aws-educate-mulai-dari-penyiapan-server-sampai-selesai/2.gif)
Cek pada EC2 AWS, server yang sudah kita buat tadi.

Note : Untuk port kubernetes yang benar, kalian dapat melihatnya disini, tapi kalau cuma untuk testing All Traffic bukan masalah.
Ansible
Setelah semua instance sudah siap, kita akan melakukan konfigurasi instance menggunakan Ansible. Apa itu Ansible?? Jadi tool ini berguna untuk melakukan tugas-tugas yang berada dalam mesin seperti installasi paket, mengubah file konfigurasi, dll. Dia (Ansible) akan melakukan tugasnya secara struktural dan jika ada satu perintah diatasnya yang gagal, maka proses dibawahnya akan dibatalkan. Anyway… Disini saya akan melakukan setup mulai dari akses SSH, installasi Docker dan Kubernetes Cluster (sebenarnya pada saat artikel ditulis, kubernetes sudah mengumumkan bahwa support pada Docker akan dihentikan, dan mungkin saat kalian membacanya, cara ini sudah tidak dapat digunakan. Pada saat itu saya akan mengupdate artikel ini.).
Jadi susunan filenya akan terlihat seperti berikut :
1
2
3
4
5
6
7
|
├── inventory
├── ansible.cfg
├── auth_aws.yml
├── docker.yml
├── k8s.yml
├── key
    └── key.pem
|
1. inventory
Inventory berisi ip atau hostname dari instance yang akan ditargetkan untuk dikonfigurasikan (biasanya ip address). Oleh karena itu saya memasang elastic ip pada instance yang sudah saya buat, agar mereka bisa diakses oleh Ansible dan setelah proses konfigurasi EIP (Elastic IP) bisa dilepas.
1
2
3
4
5
6
7
|
#ubah sesuai dengan IP address kalian
[public]
52.4.21.127

[nodes]
35.173.95.146
18.205.203.199
|
2. ansible.cfg
Disini kita bisa mengatur semua file yang dibutuhkan untuk menjalankan Ansible, seperti file inventory yang digunakan, keyfile, default user, dll.
1
2
3
4
5
6
|
[defaults]
inventory = inventory
Private_key_file = key/key.pem
remote_user = root
ansible_python_interpreter = /usr/bin/python3
host_key_checking = false
|
3. File berekstensi *.yml
File yang berisi konfigurasi seperti apa yang akan kita lakukan (like i said structural code). Kita harus mendikte apa saja yang kita perlukan untuk menyiapkan server (sampai jadi). Pesan dari saya : Kalau bingung lihat namenya saja ya
3.1 auth_aws.yml
Karena AWS tidak memperbolehkan user untuk login melalui root user (demi keamanan), maka kita harus merubah file authorized_key secara manual.
1
2
3
4
5
6
7
|
- hosts: all
  become: true
  become_user: ubuntu
  gather_facts: false
  tasks:
    - name: Copy authorized key from Home to Root
      shell: sudo cp /home/ubuntu/.ssh/authorized_keys /root/.ssh
|
3.2 docker.yml
Installasi Docker. Disini saya menggunakan fitur hold, fungsinya untuk menghindari update pada package. Kenapa?? Jika kita melakukan setup pada server production, kita memerlukan versi package yang stabil, tujuannya untuk menghindari bug atau perubahan besar-besaran yang dapat menyebabkan server menjadi tidak stabil. Jadi biasanya untuk mencoba update kami memiliki server tersendiri untuk deployment test, jika pada test server sudah stabil, maka server production akan diupdate.
 1
 2
 3
 4
 5
 6
 7
 8
 9
10
11
12
13
14
15
16
17
18
19
20
21
22
23
24
25
26
27
28
29
30
31
32
33
34
35
36
37
38
39
40
41
42
43
44
45
46
47
48
49
50
|
- hosts: all
  gather_facts: false
  tasks:
    - name: Update & Upgrade
      apt:
        upgrade: dist
        update_cache: yes

    - name: Install Docker Requiremts
      apt:
        name:
          - ca-certificates
          - curl
          - gnupg-agent
          - python3-pip
          - software-properties-common

    - name: GPG Key Docker
      apt_key:
        url: https://download.docker.com/linux/ubuntu/gpg

    - name: Repo Docker
      apt_repository:
        repo: deb [arch=amd64] https://download.docker.com/linux/ubuntu bionic stable
        state: present
        update_cache: yes

    - name: Install Docker
      apt:
        force: True
        name:
          - docker-ce

    - name: Hold Docker
      dpkg_selections:
        name: docker-ce
        selection: hold

    - name: Install Docker Py
      command: pip3 install docker-py

    - name: Enable service docker, and enable persistently
      service:
        name: docker
        enabled: yes

    - name: Add the user 'ubuntu' to docker group
      user:
        name: ubuntu
        group: docker
|
3.3 k8s.yml
Akhirnya installasi Kubernetes. Disini saya juga menggunakan fitur hold. Sayang untuk kubeadm (inisialisasi node) saya masih menggunakan cara manual, jadi jika teman-teman memiliki cara yang lebih baik saya akan dengan senang hati menerima saran tersebut.
 1
 2
 3
 4
 5
 6
 7
 8
 9
10
11
12
13
14
15
16
17
18
19
20
21
22
23
24
25
26
27
28
29
30
31
32
33
34
35
36
37
38
39
40
41
42
43
44
45
46
47
48
49
50
51
52
53
54
55
56
57
58
59
60
61
62
63
64
65
66
67
68
69
70
71
72
73
74
75
76
77
78
79
80
81
82
83
84
85
86
87
88
89
90
91
|
- hosts: all
  gather_facts: false
  tasks:
    - name: Add Google official GPG key
      apt_key:
        url: https://packages.cloud.google.com/apt/doc/apt-key.gpg
        state: present

    - name: Add Kubernetes Repository
      apt_repository:
        repo: deb http://apt.kubernetes.io/ kubernetes-xenial main
        state: present
        filename: kubernetes
        mode: 0600

    - name: Installing Kubernetes Cluster Packages
      apt:
        force: True
        name:
          - kubeadm
          - kubectl
          - kubelet
        state: present

    - name: Hold kubeadm
      dpkg_selections:
        name: kubeadm
        selection: hold
    - name: Hold kubectl
      dpkg_selections:
        name: kubectl
        selection: hold
    - name: Hold kubelet
      dpkg_selections:
        name: kubelet
        selection: hold

    - name: Add line Net Bridge on sysctl.conf
      lineinfile:
        path: /etc/sysctl.conf
        line: net.bridge.bridge-nf-call-iptables=1

    - name: Add line 'max_map_count' on sysctl.conf
      lineinfile:
        path: /etc/sysctl.conf
        line: vm.max_map_count=262144

    - name: Apply change on sysctl
      shell: sysctl -p

- hosts: public
  gather_facts: false
  tasks:
    - name: initialize k8s cluster
      shell: kubeadm reset -f && kubeadm init --pod-network-cidr=10.244.0.0/16
      register: kubeadm_result
    - debug:
        var: kubeadm_result.stdout_lines

    - name: Make configuration folder for k8s
      become: yes
      become_user: ubuntu
      file:
        state: directory
        path: /home/ubuntu/.kube
        mode: 0755

    - name: Copy configuration k8s into home
      copy:
        src: /etc/kubernetes/admin.conf
        dest: /home/ubuntu/.kube/config
        remote_src: yes
        owner: ubuntu

    - name: apply network plugin flannel
      become: yes
      become_user: ubuntu
      shell: kubectl apply -f https://raw.githubusercontent.com/coreos/flannel/master/Documentation/kube-flannel.yml

- hosts: nodes
  gather_facts: false
  vars_prompt:
    - name: "kubeadm"
      prompt: "kubeadm Command "
      private: no
  tasks:
    - name: Reset kubeadm & Prune docker images
      shell: kubeadm reset -f && docker image prune -af

    - name: Retriving input command kubeadm
      shell: "{{ kubeadm }}"
|
Jalankan ketiga file ini dengan perintah ansible-playbook nama_file.yml. Untuk k8s.yml, ditengah jalan nanti akan ditanyakan tentang token kubeadm seperti pada GIF dibawah, kalian copy saja log diatasnya jangan lupa tambahkan sudo.
![[GIF] k8s.yml kubeadm](/p/setup-kubernetes-cluster-pada-aws-educate-mulai-dari-penyiapan-server-sampai-selesai/4.gif)
Testing
Masuk ke server utama (public) kita melalui SSH.
Lalu jalankan perintah kubectl get all atau kubectl get nodes.
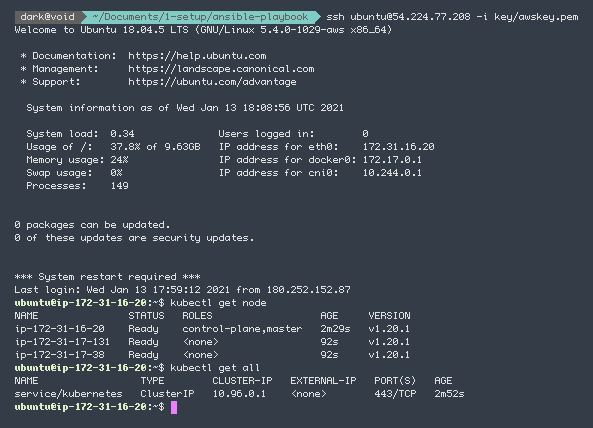
Jika semuanya sudah tampil, kita bisa melakukan deployment pods pada cluster kubernetes tersebut. Namun saya tidak akan membahasnya pada artikel ini.
Hapus EIP dan associate_public_ip_address
Delete atau beri comment pada file server.tf pada baris EIP.
1
2
3
4
5
|
## Elastic IP for Node Server (Temporary)
#resource "aws_eip" "lb-node" {
#  count = 2
#  instance = aws_instance.node[count.index].id
#}
|
Kenapa saya menghapus associate_public_ip_address? Biasanya perintah ini akan memaksa kita untuk me-recreate server. Ini pasti menyebalkan apalagi kita sudah susah-susah setup server sedemikian rupa dengan Ansible. Disatu sisi kita juga membutuhkan fitur ini saat pembuatan server untuk pertama kali. Jadi kalau server sudah dibuat, kita sudah tidak menggunakannya lagi.
1
|
# associate_public_ip_address = false
|
Jalankan perintah terraform apply sekali lagi.
Destroy Semua Server
Kalau kalian bosan, coba jalankan perintah terraform destroy!
Penutup
Dan begitulah cara saya melakukan setup server mulai dari provisioning server, konfigurasi dan membangun kubernetes cluster. Jika ada pertanyaan dan saran, silahkan dikumpulkan dikolom komentar. Selanjutnya saya akan membahas tentang Rancher. Sekian dan terimakasih